- Published on
How to make Calculator using HTML, CSS and JavaScript?

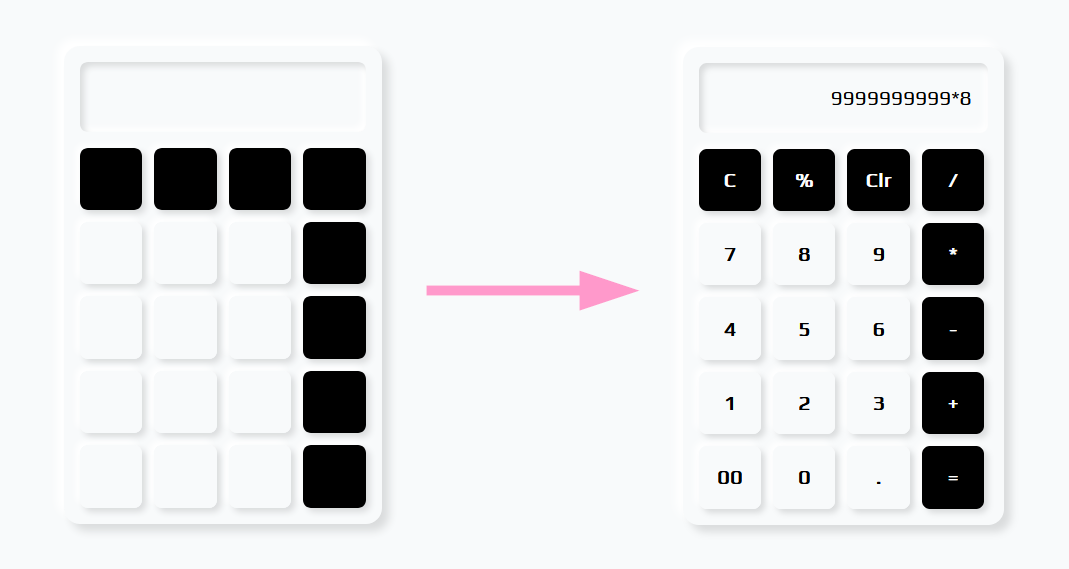
In this article, we will make a calculator using only HTML, CSS, and JavaScript. Throughout the project, you'll learn about event handling and DOM manipulations. In my opinion, this is an excellent beginner project for those who want to become web developers.
Prerequisite
- Basic Understanding of HTML, CSS, JavaScript
Project Folder Structure

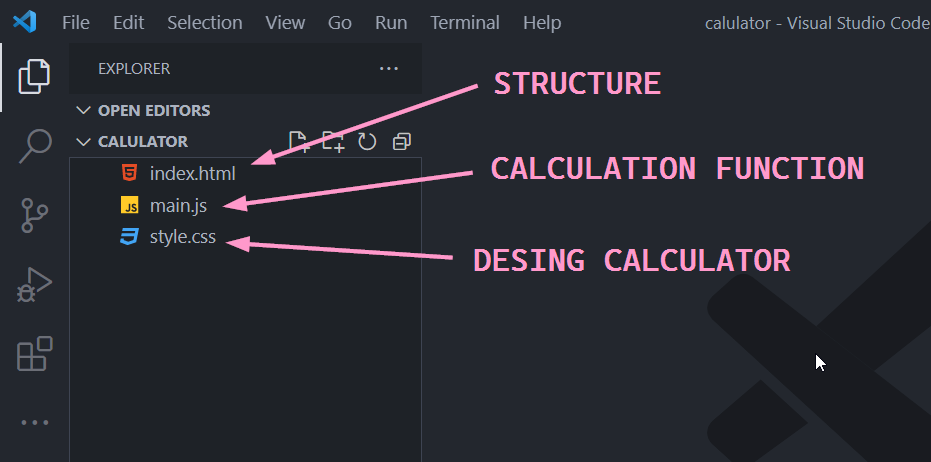
We will use HTML, CSS, and JavaScript to make the calculator. HTML is used to design the structure of the calculator. CSS is used to apply styles to the calculator and JavaScript is used to add the calculation functionality.
HTML
The HTML will be pretty simple for this project, We'll start with a standard HTML5 boilerplate. At the bottom of our body, I included the main.js script that we will create later. This needs to be at the bottom, because this way, when our JavaScript runs, the HTML elements required for the calculator will be in the DOM.
In the body, we have a main and inside that a dive with a calc__container class. We will use these wrappers to position our calculator on the page. Inside our calc__container we have a div with the class calc__display, which will represent the display of our calculator. Then we have a div with the class of calc__keyboard which will represent the keyboard of the calculator.
<!DOCTYPE html>
<html lang="en">
  <head>
    <meta charset="UTF-8" />
    <meta http-equiv="X-UA-Compatible" content="IE=edge" />
    <meta name="viewport" content="width=device-width, initial-scale=1.0" />
    <title>Calculator | hkrhasan.com</title>

    <!-- ================= style.css ================= -->
    <link rel="stylesheet" href="style.css" />
  </head>
  <body>
    <main class="main">
      <div class="calc__container">
        <div class="calc__display">

        </div>
        <div class="calc__keyboard">

        </div>
      </div>
    </main>
    <!-- ======================= main.js ======================= -->
    <script src="main.js"></script>
  </body>
</html>
The calc__display container will hold user input in input tag with class calc__input.
<input type="text" class="calc__input" />
The calc__keyboard container will hold all of the buttons. Each button will be a input tag <input type="button" /> with a class of calc__btn. This will make the styling easy, and also will help us to gather the user input. Here we have an input tag for every button that we want on our keyboard.
<input value="C" type="button" class="calc__btn black" />
<input value="%" type="button" class="calc__btn black" />
<input value="Clr" type="button" class="calc__btn black" />
<input value="/" type="button" class="calc__btn black" />
<input value="7" type="button" class="calc__btn" />
<input value="8" type="button" class="calc__btn" />
<input value="9" type="button" class="calc__btn" />
<input value="*" type="button" class="calc__btn black" />
<input value="4" type="button" class="calc__btn" />
<input value="5" type="button" class="calc__btn" />
<input value="6" type="button" class="calc__btn" />
<input value="-" type="button" class="calc__btn black" />
<input value="1" type="button" class="calc__btn" />
<input value="2" type="button" class="calc__btn" />
<input value="3" type="button" class="calc__btn" />
<input value="+" type="button" class="calc__btn black" />
<input value="00" type="button" class="calc__btn" />
<input value="0" type="button" class="calc__btn" />
<input value="." type="button" class="calc__btn" />
<input value="=" type="button" class="calc__btn black" />
Note:-
blackclass use for change color of black buttons
And this is all of the HTML markup that we need for this project, let's jump into CSS.
Don't forget to link the CSS stylesheet in the head of the HTML file:
<link rel="stylesheet" href="style.css" />
CSS
Let's open a style.css file.
first reset default style in style.css and import Google Font
/* ================== GOOGLE FONT ===================== */
@import url('https://fonts.googleapis.com/css2?family=Play&display=swap');

/* ==================== RESET LAYOUT ==================== */
* {
  margin: 0;
  padding: 0;
  box-sizing: border-box;
  font-family: 'Play', sans-serif;
}
Now we set a calc__container center and middle using flex box on parent node main. Then apply little box-shadow on calc__container
/* ===================== MAIN CONTAINER =================== */
.main {
  background: #f8fafb;
  height: 100vh;
  width: 100%;
  display: flex;
  align-items: center;
  justify-content: center;
}

/* ===================== CALCULATOR CONTAINER ========================= */
.calc__container {
  display: flex;
  flex-direction: column;
  box-shadow: 7px 7px 8px #dadcdd, -7px -7px 8px #ffffff;
  border-radius: 1rem;
  padding: 1rem;
  row-gap: 1rem;
}
Style Calculator Display
/* ====================== CALCULATOR SCREEN ======================= */
.calc__display {
  height: 70px;
  border-radius: 0.5rem;
  box-shadow: inset 4px 4px 6px #dadcdd, inset -4px -4px 6px #ffffff;
}

.calc__input {
  background-color: transparent;
  height: 100%;
  border: none;
  outline: none;
  width: 100%;
  padding: 1rem;
  font-size: 1.3rem;
  line-height: 3rem;
  text-align: right;
  caret-color: #ffbe0c;
}
Style calculator keyboard
/* ==================== CALCULATOR KEYBOARD ============================ */
.calc__keyboard {
  display: grid;
  grid-template-columns: repeat(4, max-content);
  gap: 0.75rem;
}

.calc__btn {
  height: 3.9rem;
  width: 3.9rem;
  border: none;
  outline: none;
  border-radius: 0.5rem;
  background: #f8fafb;
  box-shadow: 4px 4px 6px #dadcdd, -4px -4px 6px #ffffff;
  cursor: pointer;
  font-size: 1.3rem;
  display: flex;
  align-items: center;
  justify-content: center;
  font-weight: 600;
  transition: 0.3s;
}

.calc__btn:hover {
  background-color: #fff;
}

.black {
  background: rgb(0, 0, 0);
  color: #fff;
}

.black:hover {
  background: rgba(0, 0, 0, 0.678);
}
JavaScript
This will be the heart our application. Let's open main.js file. The first thing we need to do is to save a reference to our input[type='text'] dom element as resultBox.
const resultBox = document.querySelector("input[type='text']")
Next we have to get references for the buttons. We'll store the button references in an array. To gather the buttons we can select them by document.querySelectorAll('input[type="button"]'), and this function gives back a NodeList like array.
const buttons = document.querySelectorAll("input[type='button']")
The next and last step we have to make is to add an event listener to the buttons and build the functionalities. To add event listeners for the buttons, we'll map through the buttons NodeList and add a click event listener for each. (An advanced solution would be to only add an event listener to the input[type='button'] container and use event bubbling but this is a more beginner-friendly solution)
To determine what should we do, we'll use e.target.value, which will simply give back the value of the button that was clicked.
In the first case, when the user hits the C button we'd like to clear the display. To do that we can access our resultBox and set value to an empty string.
For the equal button we'll use javascript built in eval function. We need to provide the display's content to eval and it will evaluate and return the result, so we should set the result of the eval call to the resultBox value.
if the user hits the Clr we beed ti remove the last character from the resultBox.value. To do that we'll use the String.slice() method, but we only want to do that if the resultBox has any value.
In the default, so whenever the user don't hit these special symbols we just want to append the clicked button's value to the resultBox value. We can use the += operator to do that.
// iterate mapping
buttons.forEach((button) => {
  // add click event
  button.addEventListener('click', (e) => {
    // this line for reset input container value
    if (e.target.value === 'C') {
      // remove last character from input container
      resultBox.value = ''
    } else if (e.target.value === '=') {
      // check if user want result
      if (resultBox.value) resultBox.value = eval(resultBox.value) // now first check resultBox has value or not, then evaluate resultBox value if exist
    } else if (e.target.value === 'Clr') {
      // check user press clear button
      if (resultBox.value) resultBox.value = resultBox.value.slice(0, -1)
    } else {
      // default case user press simple button, then add button value into input container
      resultBox.value += e.target.value
    }
  })
})
And that's it you have a working calculator.
Full Project code
<!DOCTYPE html>
<html lang="en">
  <head>
    <meta charset="UTF-8" />
    <meta http-equiv="X-UA-Compatible" content="IE=edge" />
    <meta name="viewport" content="width=device-width, initial-scale=1.0" />
    <title>Calculator | hkrhasan.com</title>

    <!-- ================= style.css ================= -->
    <link rel="stylesheet" href="style.css" />
  </head>
  <body>
    <main class="main">
      <div class="calc__container">
        <div class="calc__display">
          <input type="text" class="calc__input" id="" />
        </div>
        <div class="calc__keyboard">
          <input value="C" type="button" class="calc__btn black" />
          <input value="%" type="button" class="calc__btn black" />
          <input value="Clr" type="button" class="calc__btn black" />
          <input value="/" type="button" class="calc__btn black" />
          <input value="7" type="button" class="calc__btn" />
          <input value="8" type="button" class="calc__btn" />
          <input value="9" type="button" class="calc__btn" />
          <input value="*" type="button" class="calc__btn black" />
          <input value="4" type="button" class="calc__btn" />
          <input value="5" type="button" class="calc__btn" />
          <input value="6" type="button" class="calc__btn" />
          <input value="-" type="button" class="calc__btn black" />
          <input value="1" type="button" class="calc__btn" />
          <input value="2" type="button" class="calc__btn" />
          <input value="3" type="button" class="calc__btn" />
          <input value="+" type="button" class="calc__btn black" />
          <input value="00" type="button" class="calc__btn" />
          <input value="0" type="button" class="calc__btn" />
          <input value="." type="button" class="calc__btn" />
          <input value="=" type="button" class="calc__btn black" />
        </div>
      </div>
    </main>
    <!-- ======================= main.js ======================= -->
    <script src="main.js"></script>
  </body>
</html>
/* ================== GOOGLE FONT ===================== */
@import url("https://fonts.googleapis.com/css2?family=Play&display=swap");

/* ==================== RESET LAYOUT ==================== */
* {
  margin: 0;
  padding: 0;
  box-sizing: border-box;
  font-family: "Play", sans-serif;
}

/* ===================== MAIN CONTAINER =================== */
.main {
  background: #f8fafb;
  height: 100vh;
  width: 100%;
  display: flex;
  align-items: center;
  justify-content: center;
}

/* ===================== CALCULATOR CONTAINER ========================= */
.calc__container {
  display: flex;
  flex-direction: column;
  box-shadow: 7px 7px 8px #dadcdd, -7px -7px 8px #ffffff;
  border-radius: 1rem;
  padding: 1rem;
  row-gap: 1rem;
}

/* ====================== CALCULATOR SCREEN ======================= */
.calc__display {
  height: 70px;
  border-radius: 0.5rem;
  box-shadow: inset 4px 4px 6px #dadcdd, inset -4px -4px 6px #ffffff;
}

.calc__input {
  background-color: transparent;
  height: 100%;
  border: none;
  outline: none;
  width: 100%;
  padding: 1rem;
  font-size: 1.3rem;
  line-height: 3rem;
  text-align: right;
  caret-color: #ffbe0c;
}

/* ==================== CALCULATOR KEYBOARD ============================ */
.calc__keyboard {
  display: grid;
  grid-template-columns: repeat(4, max-content);
  gap: 0.75rem;
}

.calc__btn {
  height: 3.9rem;
  width: 3.9rem;
  border: none;
  outline: none;
  border-radius: 0.5rem;
  background: #f8fafb;
  box-shadow: 4px 4px 6px #dadcdd, -4px -4px 6px #ffffff;
  cursor: pointer;
  font-size: 1.3rem;
  display: flex;
  align-items: center;
  justify-content: center;
  font-weight: 600;
  transition: 0.3s;
}

.calc__btn:hover {
  background-color: #fff;
}

.black {
  background: rgb(0, 0, 0);
  color: #fff;
}

.black:hover {
  background: rgba(0, 0, 0, 0.678);
}
const resultBox = document.querySelector("input[type='text']"); // select calculator input container
const buttons = document.querySelectorAll("input[type='button']"); // select all input button element


// buttons mapping
buttons.forEach((button) => {
  // add click event
  button.addEventListener("click", (e) => {
    // this line for reset input container value
    if (e.target.value === "C") {
      // remove last character from input container
      resultBox.value = "";
    } else if (e.target.value === "=") {
      // check if user want result
      if (resultBox.value) resultBox.value = eval(resultBox.value); // now first check resultBox has value or not, then evaluate resultBox value if exist
    } else if (e.target.value === "Clr") {
      // check user press clear button
      if (resultBox.value) resultBox.value = resultBox.value.slice(0, -1);
    } else {
      // default case user press simple button, then add button value into input container
      resultBox.value += e.target.value;
    }
  });
});