HTML Form Tag | How to Create form in website?
HTML Forms
An HTML form is a section of a document which contains different fields like text text field, password fields, checkboxes, radio buttons, submit button, select menus etc.
HTML Forms can be used where we want to collect some data from the site visitor. For example, in case of user registration you would like to collect information such as name, email address, phone number etc.
A form will take input then store it to a back-end application such as nodejs, python or php script etc. The backend application will perform required processing on the passed data like storing it in database.
There are various form elements available like text fields, selective fields, radio buttons, checkboxes etc.
HTML Form Structure
The HTML <form> tag defines a form that is used to collect user input. All the form elements should be written inside <form> and </form> tags.
<form>
    .........
    Form Elements
    '''''''''
</form>
HTML Form Elements
| Element | Description |
|---|---|
<input> |
It defines an input control |
<select> |
It defines a selective input control |
<option> |
It defines an option in a selective input |
<textarea> |
It defines a multi-line input control |
<button> |
It defines a clickable button |
<fieldset> |
It groups the related element in form |
<legend> |
It defines a caption for a <fieldset> element. |
<optgroup> |
It defines a group of related options in a <select> field |
<label> |
It defines a label for a field |
<datalist> |
It define a list of pre-defined options for an <input> element |
HTML <input> Element
The most important form element is the <input> element. The <input> element can be displayed in several ways, depending on the type attribute.
<label for="fname">First Name: </label>
<input type="text" id="fname">
Output


All the different values of the type attribute are covered in this article : HTML INPUT TYPES
HTML <label> Element
The <label> element defines a label for several form elements.
The <label> element is useful for screen-reader users, because the screen-reader will read out loud the label when the user focus on the input element.
The <label> element also help users who have difficulty clicking on very small regions (such as radio buttons or checkboxes) - because when the user clicks the text within the <label> element, it toggles the radio button/checkbox.
The for attribute of the <label> tag should be equal to the id attribute of the <input> element to bind them together.
HTML <select> Element
The <select> element defines a selective list:
<label for="reason">Why you want to become programer:</label>
<select id="reason">
  <option value="love programing">I Love PROGRAMMING</option>
  <option value="want a job">I WANT A JOB</option>
  <option value="family pressure">BECAUSE OF FAMILY PRESSURE</option>
</select>
Output


- The
<option>element defines different options that can be selected. - By default, the first item in the selective list is selected
- To define a pre-selected option, add the selected attribute to the option :
<label for="reason">Why you want to become programer:</label>
<select id="reason">
  <option value="love programing">I Love PROGRAMMING</option>
  <option value="want a job" selected>I WANT A JOB</option>
  <option value="family pressure">BECAUSE OF FAMILY PRESSURE</option>
</select>
Output

Visible Values
Use the size attribute to specify the number of visible values:
<label for="reason">Why you want to become programer:</label>
<select id="reason" size="3">
  <option value="love programing">I Love PROGRAMMING</option>
  <option value="want a job" selected>I WANT A JOB</option>
  <option value="family pressure">BECAUSE OF FAMILY PRESSURE</option>
</select>
Output

Select Multiple Values
Use the multiple attribute to allow the user to select more than one value:
<label for="reason">Why you want to become programer:</label>
<select id="reason" size="3" multiple>
  <option value="love programing">I Love PROGRAMMING</option>
  <option value="want a job" selected>I WANT A JOB</option>
  <option value="family pressure">BECAUSE OF FAMILY PRESSURE</option>
</select>
Output

Note: Hold down the Ctrl (windows) / Command (Mac) button to select multiple options.
HTML <textarea> Element
The <textarea> element defines a multi-line input field:
<textarea rows='10' cols='50'>
    Think About Your Career
</textarea>
Output


- The
rowsattribute specifies the visible number of lines in a text area. - The
colsattribute specifies the visible width of a text area.
HTML <button> Element
<button type="button"> Click Me!</button>
Output


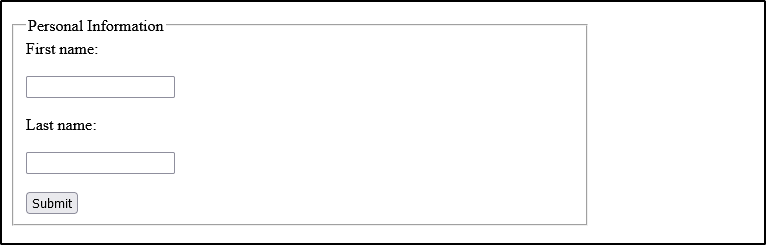
The <fieldset> and <legend> Elements
The <fieldset> element is used to group related data in a form and the <legend> element defines a caption for the <fieldset> element.
<form action="/action.php">
    <fieldset>
        <legend>Personal Information</legend>
        <label for="fname">First name:</label><br><br>
        <input type="text" id="fname" name="fname"><br><br>
        <label for="lname">Last name:</label><br><br>
        <input type="text" id="lname" name="lname"><br><br>
        <input type="submit" value="Submit">
    </fieldset>
</form>
Output

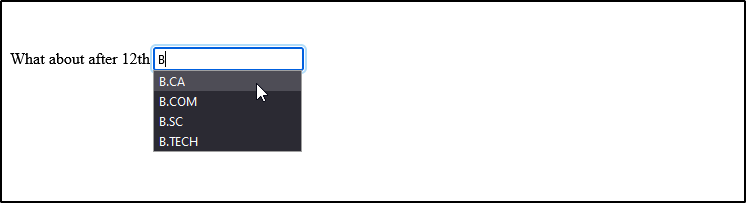
The <datalist> Element
The <datalist> element specifies a list of pre-defined options for an <input> element
Users will see a drop-down list of the pre-defined options as they input data.
The list attribute of the <input> element, must refer to the id attribute of the <datalist> element.
 <form action="/action.php">
    <label>What about after 12th</label>
    <input list="career">
    <datalist id="career">
        <option value="B.CA">
        <option value="B.COM">
        <option value="B.SC">
        <option value="B.TECH">
        <option value="NO DECIDE">
    </datalist>
</form>
Output